1、配置加载现象
-
加载场景说明
假设有一个特殊的场景的配置文件如下表,那么配置文件是如何生效,以及加载的顺序是怎么样的呢?有多个地方均配置了相同的参数,到底是哪一个参数项在应用中生效的呢?
| 配置文件 | 配置项 |
|---|---|
| application.yaml | xxx:yyy:zzz: from-application.yaml |
| application-dev.yaml | xxx:yyy:zzz: from-application-dev.yaml |
| bootstrap.yaml | xxx:yyy:zzz: from-bootstrap.yaml |
| config-server | xxx:yyy:zzz: from-config-order.yaml |
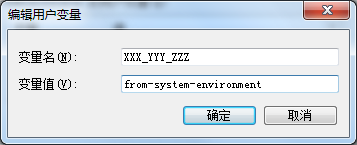
| 系统环境变量 | XXX_YYY_ZZZ=from-system-environment |
| jvm启动参数 | -Dxxx.yyy.zzz=from-jvm-args |
若使用了配置中心,需增加spring-cloud配置中心配置。
2、示例代码演示
| 说明 | 版本 |
|---|---|
jdk |
1.8 |
spring-boot |
2.6.2 |
spring-cloud |
2021.0.0 |
- 2.1、建立一个配置中心
config-server,先申请好gitee,方便演示配置中心从git上获取配置项
(1) pom.xml如下
<?xml version="1.0" encoding="UTF-8"?>
<project xmlns="http://maven.apache.org/POM/4.0.0" xmlns:xsi="http://www.w3.org/2001/XMLSchema-instance"
	xsi:schemaLocation="http://maven.apache.org/POM/4.0.0 https://maven.apache.org/xsd/maven-4.0.0.xsd">
	<modelVersion>4.0.0</modelVersion>
	<parent>
		<groupId>org.springframework.boot</groupId>
		<artifactId>spring-boot-starter-parent</artifactId>
		<version>2.6.2</version>
		<relativePath/> <!-- lookup parent from repository -->
	</parent>
	<groupId>com.mixfate</groupId>
	<artifactId>config-server</artifactId>
	<version>0.0.1-SNAPSHOT</version>
	<name>config-server</name>
	<properties>
		<java.version>1.8</java.version>
		<spring-cloud.version>2021.0.0</spring-cloud.version>
	</properties>
	<dependencies>
		<dependency>
			<groupId>org.springframework.cloud</groupId>
			<artifactId>spring-cloud-config-server</artifactId>
		</dependency>

		<dependency>
			<groupId>org.springframework.boot</groupId>
			<artifactId>spring-boot-starter-test</artifactId>
			<scope>test</scope>
		</dependency>
	</dependencies>
	<dependencyManagement>
		<dependencies>
			<dependency>
				<groupId>org.springframework.cloud</groupId>
				<artifactId>spring-cloud-dependencies</artifactId>
				<version>${spring-cloud.version}</version>
				<type>pom</type>
				<scope>import</scope>
			</dependency>
		</dependencies>
	</dependencyManagement>

	<build>
		<plugins>
			<plugin>
				<groupId>org.springframework.boot</groupId>
				<artifactId>spring-boot-maven-plugin</artifactId>
			</plugin>
		</plugins>
	</build>

</project>
(2) ConfigServerApplication.java如下
package com.mixfate;

import org.springframework.boot.SpringApplication;
import org.springframework.boot.autoconfigure.SpringBootApplication;
import org.springframework.cloud.config.server.EnableConfigServer;

@EnableConfigServer
@SpringBootApplication
public class ConfigServerApplication {

	public static void main(String[] args) {
		SpringApplication.run(ConfigServerApplication.class, args);
	}

}
(3) application.yaml如下
spring:
  cloud:
    config:
      server:
        git:
          uri: https://gitee.com/xxx/spring-cloud-config
          username: xxx
          password: 123456
          default-label: master
server:
  port: 8082
logging:
  level:
    root: info
    org.springframework.cloud: debug
需在
gitee上创建一个仓库spring-cloud-config(名字可随意取),default-label: master表示使用master分支。
- 2.2、创建一个演示项目
config-order,演示配置文件的加载顺序
(1) pom.xml如下
<?xml version="1.0" encoding="UTF-8"?>
<project xmlns="http://maven.apache.org/POM/4.0.0" xmlns:xsi="http://www.w3.org/2001/XMLSchema-instance"
         xsi:schemaLocation="http://maven.apache.org/POM/4.0.0 https://maven.apache.org/xsd/maven-4.0.0.xsd">
    <modelVersion>4.0.0</modelVersion>
    <parent>
        <groupId>org.springframework.boot</groupId>
        <artifactId>spring-boot-starter-parent</artifactId>
        <version>2.6.2</version>
        <relativePath/> <!-- lookup parent from repository -->
    </parent>
    <groupId>com.mixfate</groupId>
    <artifactId>config-order</artifactId>
    <version>0.0.1-SNAPSHOT</version>
    <name>config-order</name>
    <properties>
        <java.version>1.8</java.version>
        <spring-cloud.version>2021.0.0</spring-cloud.version>
    </properties>
    <dependencies>
        <dependency>
            <groupId>org.springframework.cloud</groupId>
            <artifactId>spring-cloud-starter-config</artifactId>
        </dependency>

        <dependency>
            <groupId>org.springframework.cloud</groupId>
            <artifactId>spring-cloud-starter-bootstrap</artifactId>
        </dependency>

        <dependency>
            <groupId>org.springframework.boot</groupId>
            <artifactId>spring-boot-starter-test</artifactId>
            <scope>test</scope>
        </dependency>
    </dependencies>
    <dependencyManagement>
        <dependencies>
            <dependency>
                <groupId>org.springframework.cloud</groupId>
                <artifactId>spring-cloud-dependencies</artifactId>
                <version>${spring-cloud.version}</version>
                <type>pom</type>
                <scope>import</scope>
            </dependency>
        </dependencies>
    </dependencyManagement>

    <build>
        <plugins>
            <plugin>
                <groupId>org.springframework.boot</groupId>
                <artifactId>spring-boot-maven-plugin</artifactId>
            </plugin>
        </plugins>
    </build>

</project>
(2) ConfigOrderApplication.java如下
package com.mixfate;

import org.springframework.beans.factory.annotation.Value;
import org.springframework.boot.ApplicationArguments;
import org.springframework.boot.ApplicationRunner;
import org.springframework.boot.SpringApplication;
import org.springframework.boot.autoconfigure.SpringBootApplication;
import org.springframework.stereotype.Component;

@SpringBootApplication
public class ConfigOrderApplication {

    public static void main(String[] args) {
        SpringApplication.run(ConfigOrderApplication.class, args);
    }

}

@Component
class InitRunner implements ApplicationRunner {

    @Value("${xxx.yyy.zzz}")
    private String name;

    @Override
    public void run(ApplicationArguments args) throws Exception {
        System.out.println("xxx.yyy.zzz is " + name);
    }

}
使用了
InitRunner演示应用初始化时输出参数的值。
(3) yaml配置文件如下
bootstrap.yaml配置
spring:
  cloud:
    config:
      uri: http://localhost:8082
  application:
    name: config-order
  profiles:
    active: dev
xxx:
  yyy:
    zzz: from-bootstrap.yaml

application.yaml配置
server:
  port: 8085
logging:
  level:
    root: info
xxx:
  yyy:
    zzz: from-application.yaml

application-dev.yaml配置
xxx:
  yyy:
    zzz: from-applicatoin-dev.yaml
需注册在
gitee上的仓库spring-cloud-config中需要建立config-order.yaml,即与此应用同名,启动配置中心后可使用http://localhost:8082/config-order.yaml访问,查看配置信息。
- 2.3、演示案例
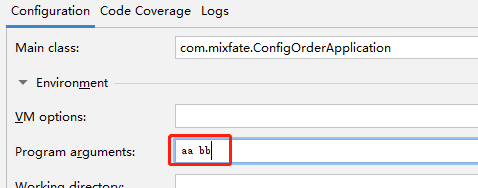
配置环境好环境变量以及jvm启动参数

运行程序可以看到以下结果xxx.yyy.zzz is from-config-order.yaml,说明从配置中心获取到了配置项。
接着将配置中心的配置项改掉,表示配置中心无对应的配置项,如下
config-order.yaml
xxx:
  yyy:
    zzz000: from-config-order.yaml
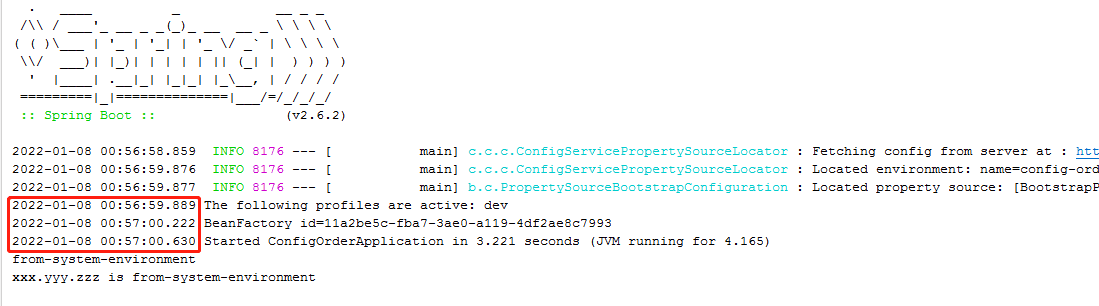
再次运行程序可以看到结果xxx.yyy.zzz is from-jvm-args,说明从jvm启动参数中获取到了,若将jvm参数去掉,则结果变为xxx.yyy.zzz is from-system-environment,说明从系统环境变量中获取到了。可以看到这个配置加载是有顺序的,可以继续尝试修改剩下的配置文件中的参数查看结果。
3、配置源码解析
- idea 中运行调试逐步查看源码
从SpringApplication.run(ConfigOrderApplication.class, args);开始debug,一直调试进入到SpringApplication类的方法ConfigurableApplicationContext run(String... args)中,直到configureIgnoreBeanInfo(environment);这一行,查看一下变量environment,如下图
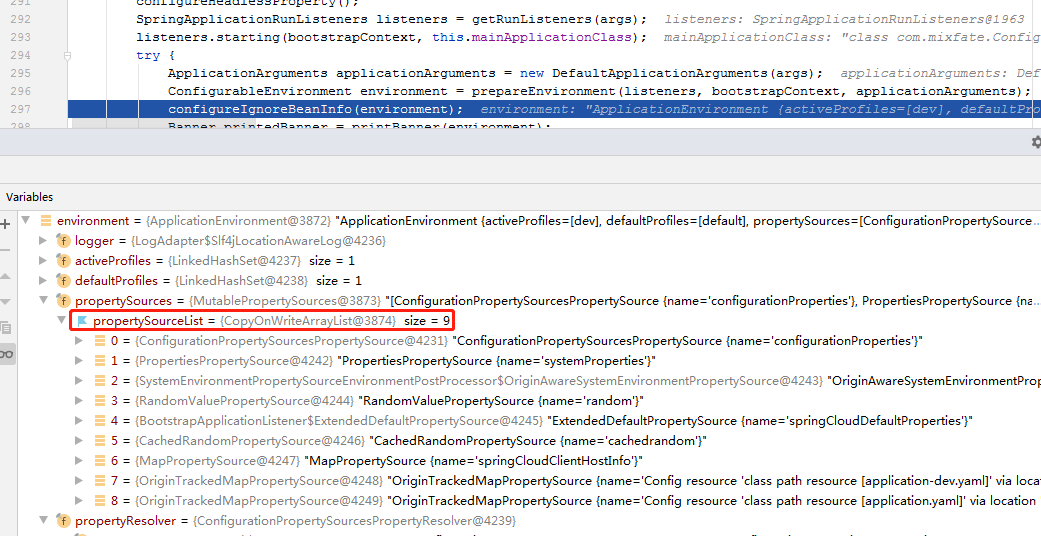
查看关键属性environment中propertySources的propertySourceList,可以看到这个List中初始化了9个属性来源,当然可以还有其他的,不过在此演示一些关键的配置项。同时可以看到关键属性propertyResolver,即属性解析器。
上面截图的List中要以看到配置文件的顺序是configurationProperties -> systemProperties -> systemEnvironment -> ... -> bootstrap.yaml -> ... -> appplication-dev.yaml -> application.yaml
接下来看看这个PropertySourceList是怎么拼装起来的,跟踪到方法 ConfigurableEnvironment prepareEnvironment中,查看变量environment的值,如下图
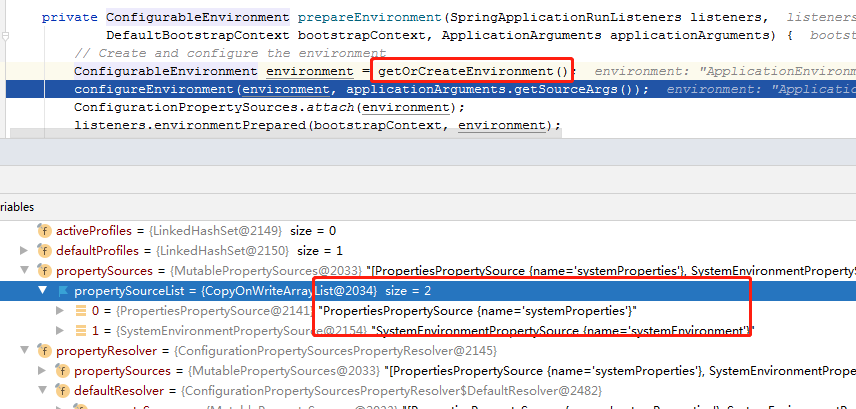
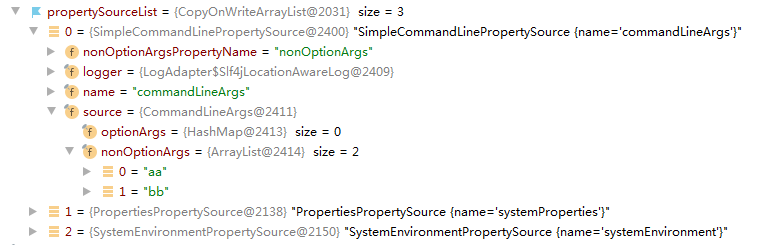
可以看到getOrCreateEnvironment()方法创建完成后按顺序有两个值systemProperties和systemEnvironment,接着继续configureEnvironment(environment, applicationArguments.getSourceArgs());此方法后查看变量,根据变量名可以猜想到应该是属于args参数,于是配置上参数观察如下,其为commandLineArgs,且加到了第一位置
跟踪方法configurePropertySources可以看到sources.addFirst将其添加到了第一位。
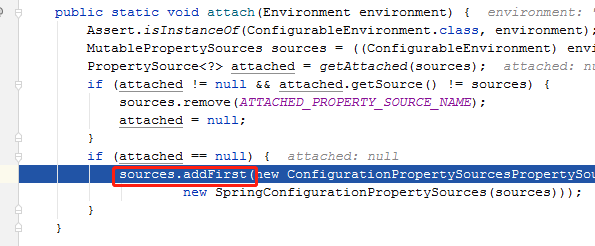
接下来是到ConfigurationPropertySources.attach(environment);,进到方法attach方法后可以跟踪到又有一个sources.addFirst,将其放到第一的位置。
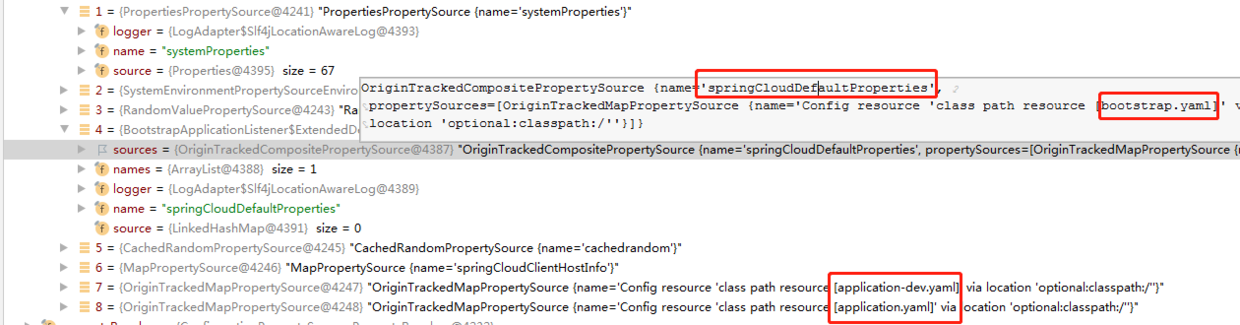
接着跑完listeners.environmentPrepared(bootstrapContext, environment);后可以观察到加了几项配置,在prepareEnvironment方法完成后完成了基础的准备,接着是关键方法prepareContext中完成初始化的过程。最后的结果如下
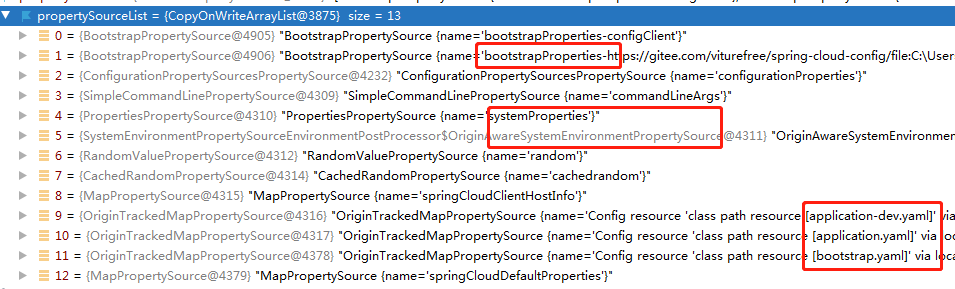
其中bootstrap.yaml配置是通过BootstrapApplicationListener的方法initialize中调用reorderSources完成的,可以看到是addLast;而bootstrapProperties即配置中心是通过PropertySourceBootstrapConfiguration的方法initialize中最后调用insertPropertySources完成的,其中的incoming.addFirst(p);将配置中心放到了最前面。
- 属性读取的过程
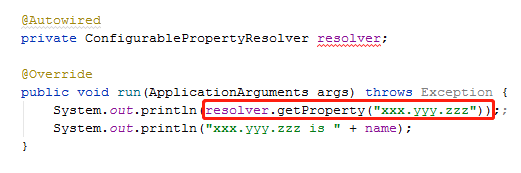
前面跟着调试的代码大概了解了propertySourceList的拼装过程,下面看看PropertiesResolver是怎么解析的,同样是写一段演示代码如下,并跟踪其执行过程。
一路调试跟踪到ConfigurationPropertySourcesPropertyResolver类中的方法findPropertyValue,再跟进到attached.findConfigurationProperty(name),可以方法里面的for循环里面getSource(),打开Evaluate录入可以看到getSource() 里面的即是前一步的propertySourceList,如下图
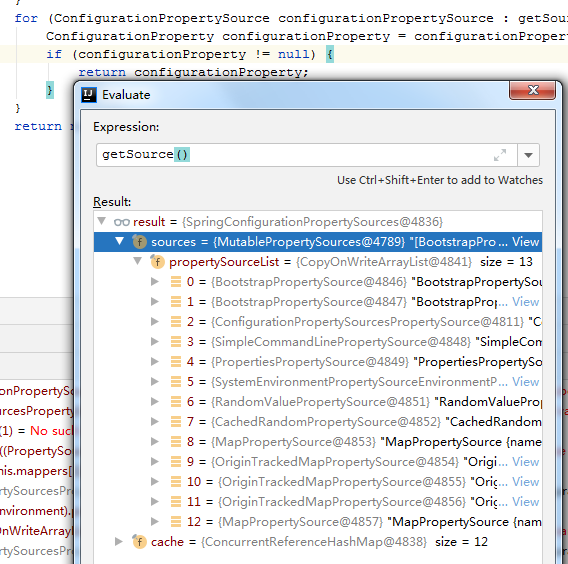
从这里就可以看出关键的点,属性是从propertySourceList逐个去解析的,若前面已经获取到对应的值,则后面配置的值就不会再解析了,所以这是个优先级的问题,并不是不同配置文件之间参数覆盖的过程。
前面还注意到一个点,在配置系统环境变量的时候,配置的环境变量参数为XXX_YYY_ZZZ而并不是xxx.yyy.zzz,为什么同样可以解析到呢?这个其实是一个约定的解析方法。同样是跟踪获取配置项的方法一直进入到SpringConfigurationPropertySource的方法getConfigurationProperty中,如下
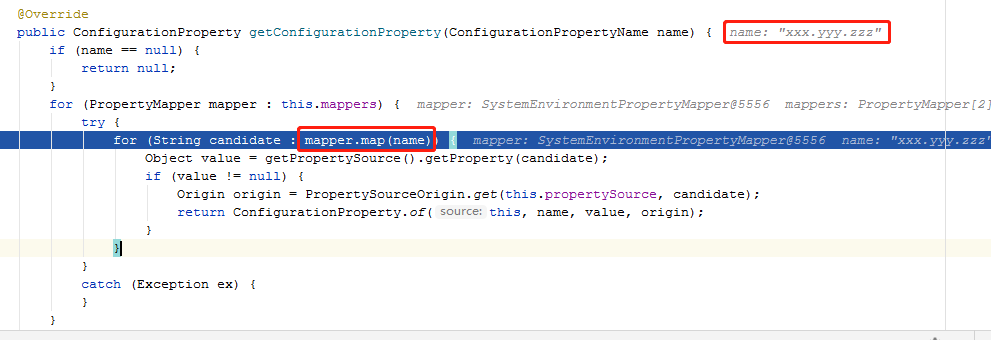 可以看到
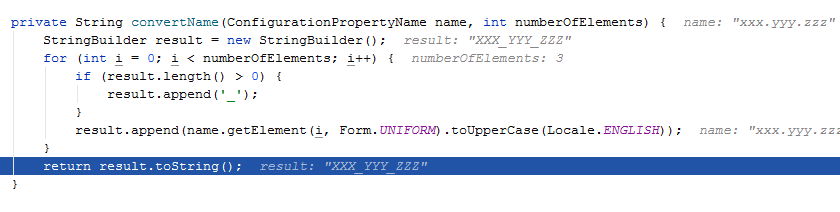
可以看到name=xxx.yyy.zzz,其中有个mapper.map(name),注意看mapper为SystemEnvironmentPropertyMapper,继续跟踪到里面即可发现有个转换的过程convertName,即如下图,将xxx.yyy.zzz转换为XXX_YYY_ZZZ,所以也是可以的。
- 配置加载时间先后顺序的问题
前面可以看到配置文件的加载中,若从配置中心获取到配置则需要启动到prepareContext时才能从配置中心读取到配置项,如果是在配置中心配置了不同的日志格式呢?是不是得在加载到配置中心后才开始使用新的日志格式呢?可以实践得到结果的确是的,如配置中心定义日志格式为console: "%clr(%d{yyyy-MM-dd HH:mm:ss.SSS}){faint} %m%n",启动日志如下
可以看到控制台日志格式的一个变化过程。
4、总结
经过上面的分析可以得出常用配置文件中读取配置的结论:config配置中心 => jvm参数 => 系统环境变量 => 项目内的application-xxx.yaml => 项目内的application.yaml => bootstrap.yaml
spring-boot 项目可以有多种灵活的方式设置配置项,一般来说项目内的application.yaml是一个默认配置项,再通过基本配置项对参数进行不同的赋值。
赞赏(Donation)
微信(Wechat Pay)