SpringCloud中应用Rabbitmq实现延时消息的两种方式
SpringCloud中应用Rabbitmq实现延时消息的两种方式
1、使用队列的ttl特性【延时队列】
使用队列的ttl特性,即配置死信队列的消息重新路由到消费队列中,同一个队列的消息过期时间将相同,即使消息本身可能带上了ttl,同样会因队头的消息未过期而无法消费;
- 关键配置说明
spring:
  cloud:
    stream:
      bindings:
        input:
          destination: delay_message_queue_input
          group: test-service
        output:
          destination: delay_message_queue_output
          producer:
            required-groups: test-service
      rabbit:
        bindings:
          input:
            consumer:
              exchangeType: direct
          output:
            producer:
              ttl: 3000
              autoBindDlq: true
              deadLetterExchange: delay_message_queue_input
              deadLetterQueueName: delay_message_queue_input.test-service
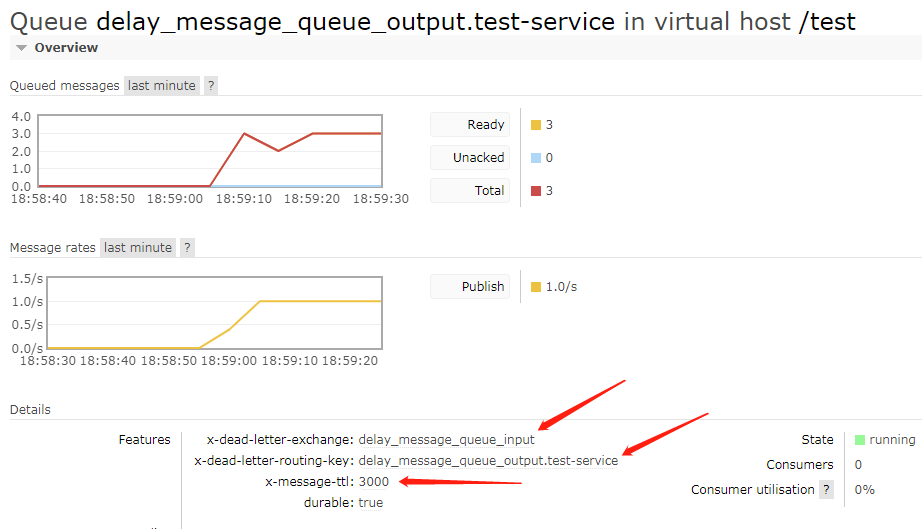
定义两个队列delay_message_queue_output及delay_message_queue_input,并将delay_message_queue_output声明为延时队列,设定队列的ttl为3000ms,
deadLetterExchange及deadLetterQueueName表示若消息过期将转发至此交换机。
2、使用延时插件实现【延时交换机】
使用延时交换机实现延时消息更加灵活,需要先安装rabbitmq的延时插件,但要控制好消息的总数量,可以针对每个消息设置任意的过期时间,交换机中的消息如果过期将路由到绑定的队列中进行消费;
- 关键配置说明
spring:
  cloud:
    stream:
      bindings:
        input:
          destination: delay_message_exchange
          group: test-service
        output:
          destination: delay_message_exchange
      rabbit:
        bindings:
          input:
            consumer:
              delayed-exchange: true
          output:
            producer:
              delayed-exchange: true
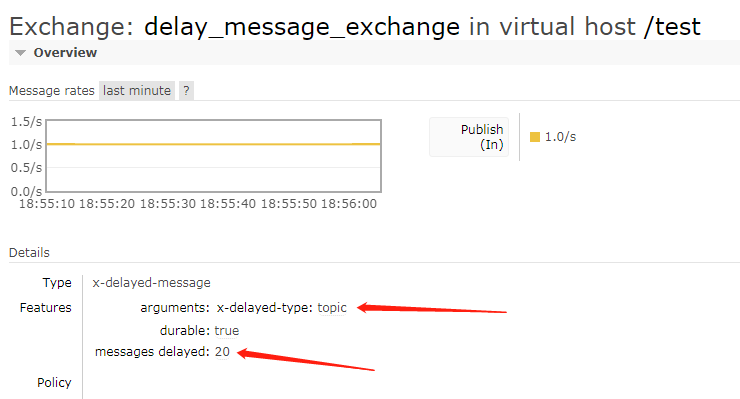
定义两个队列并声明为延时exchnage,delayed-exchange需rabbitmq延时插件支持,在发送消息时带上x-delay参数指定过期时间;
    public void sendDelayExchangeMessage(String message) {
        log.info("send message {}", message);
        processor.output().send(MessageBuilder.withPayload(message).setHeader("x-delay",20000).build());
    }
3、两种实现方式比较
- 延时队列
mvn clean compile exec:exec -Dexec.executable="java" -Dexec.args="-cp %classpath com.hugesoft.Application --spring.rabbitmq.host=192.168.88.100 --spring.profiles.active=queue

- 延时交换机
mvn clean compile exec:exec -Dexec.executable="java" -Dexec.args="-cp %classpath com.hugesoft.Application --spring.rabbitmq.host=192.168.88.100 --spring.profiles.active=exchange"

使用队列的方式只能用于所有消息的过期时间均相同的情况下,延时中的消息总数可以延时队列中查看到,使用交换机插件的方式更加灵活,可以针对每个消息设置不同的超时,适应更多的业务场景,延时中的消息总数可以延时的交换机中查看到;
github地址https://github.com/viturefree/rabbitmq-delay

