elasticsearch8集群安装部署使用
1、ES集群环境准备
| 节点 | ip |
|---|---|
| node-a | 192.168.91.136 |
| node-b | 192.168.91.134 |
host配置如下
192.168.91.136 node-a
192.168.91.134 node-b
创建账号、环境变量设置、系统文件数限制等与单机版一致,单机版演示过xpack.security.http.ssl.enabled: true,使用了自签证书,在此集群环境中设置为false。只演示集群中的通信使用自签证书,首先xpack.security.enabled: true仍需设置为true
2、生成集群内部(transport)安全通信证书
- 生成
ca证书
./bin/elasticsearch-certutil ca
默认ca文件名为elastic-stack-ca.p12,同时需要输入ca密码[123456];
- 生成节点通信证书
./bin/elasticsearch-certutil cert --ca elastic-stack-ca.p12

Enter password for CA (elastic-stack-ca.p12) : [123456]
Please enter the desired output file [elastic-certificates.p12]:
Enter password for elastic-certificates.p12 :[12345678]
默认证书文件名为elastic-certificates.p12,同时输入证书密码[12345678];将此证书文件放到各个节点的目录config/certs下
mkdir config/certs
mv elastic-certificates.p12 config/certs/
chown elastic config/certs -R
- 所有节点设置节点通信密码(因每个节点使用相同的证书文件)
./bin/elasticsearch-keystore add xpack.security.transport.ssl.keystore.secure_password
./bin/elasticsearch-keystore add xpack.security.transport.ssl.truststore.secure_password
设置通信证书密码为12345678
3、配置elasticsearch.yml
node-a节点配置
cluster.name: es8.1.0-cluster
node.name: node-a
network.host: 192.168.91.136
discovery.seed_hosts: ["192.168.91.134"]
cluster.initial_master_nodes: ["192.168.91.136", "192.168.91.134"]

ingest.geoip.downloader.enabled: false
xpack.security.enabled: true
xpack.security.http.ssl:
  enabled: false

xpack.security.transport.ssl:
  enabled: true
  verification_mode: certificate
  keystore.path: certs/elastic-certificates.p12
  truststore.path: certs/elastic-certificates.p12
node-b节点配置(与node-a节点配置的差异部分,其他配置相同)
node.name: node-b
network.host: 192.168.91.134
discovery.seed_hosts: ["192.168.91.136"]
需要注意discovery.seed_hosts的配置是其他ES节点
- 修改节点密码(每个节点均重置为
elastic8888)
./bin/elasticsearch-reset-password --username elastic -i
4、启动集群并进行简单测试
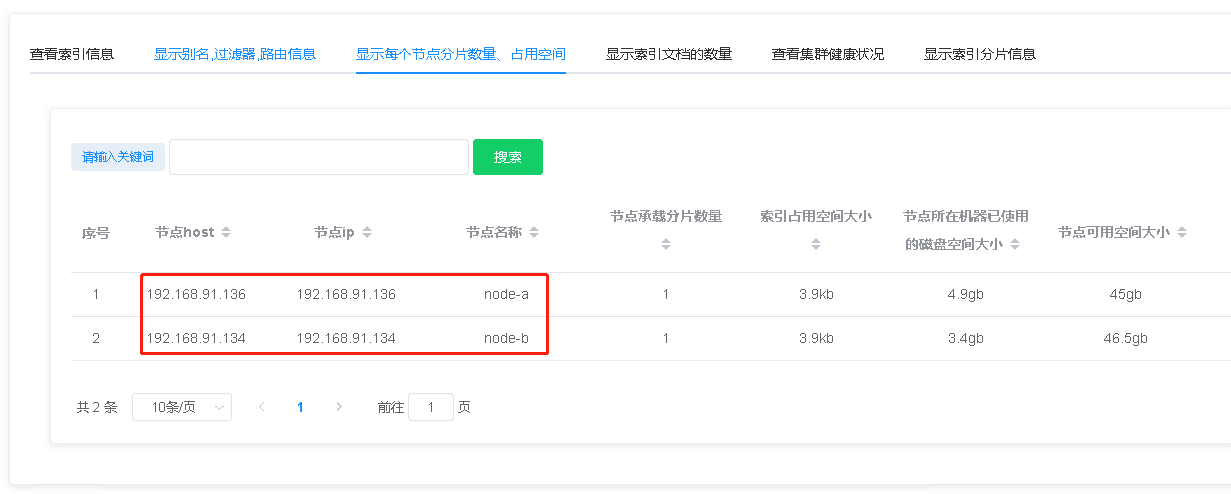
启动集群后,可使用ElasticView查看节点信息

- 建立一个索引,并测试此索引
curl -X PUT -H 'content-type:application/json' -u elastic:elastic8888  http://192.168.91.136:9200/user-index \
-d '{"settings": {
  "number_of_shards": 2,
  "number_of_replicas": 1
}}'
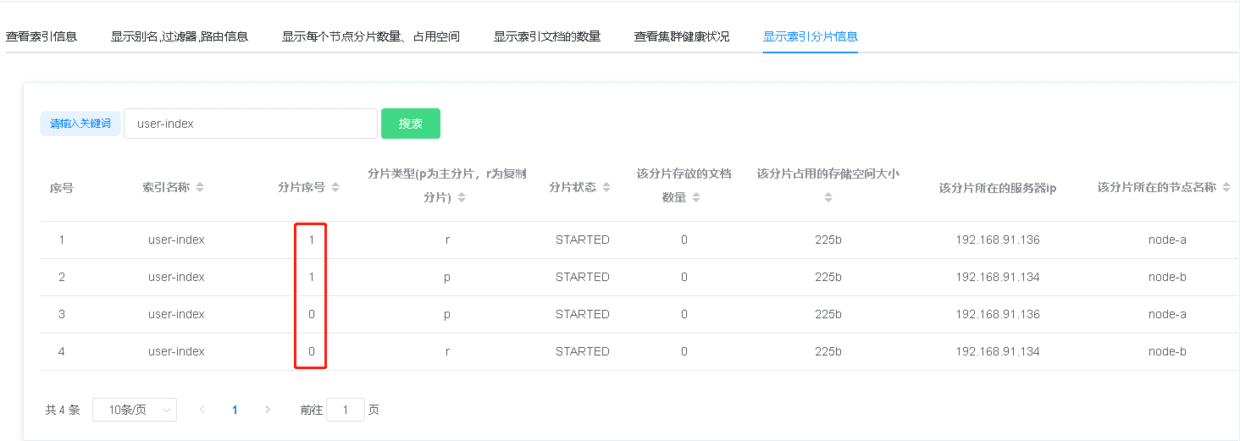
创建一个索引user-index,指定2个分片和1个副本,再从ElasticView控制台上可直观观察;

可以看到索引有两个主分片,分别在a和b两台机器,且节点互为副本节点
- 创建索引的
mapping
curl -X PUT -H 'content-type:application/json' -u elastic:elastic8888 http://192.168.91.136:9200/user-index/_mapping \
-d '{"properties": {
        "name": {
            "type": "keyword"
        },
        "type": {
            "type": "integer"
        },
        "content": {
            "type": "text"
        }
    }
}'

写入一些测试数据
curl -X POST -H "content-type:application/json;charset=utf-8" -u elastic:elastic8888 http://192.168.91.136:9200/user-index/_create/1 \
-d '{"name":"测试","type":100,"content":"测试永远滴神啊。。。"}'
5、编写客户端连接测试
- 编写
pom.xml依赖
<?xml version="1.0" encoding="UTF-8"?>
<project xmlns="http://maven.apache.org/POM/4.0.0" xmlns:xsi="http://www.w3.org/2001/XMLSchema-instance"
         xsi:schemaLocation="http://maven.apache.org/POM/4.0.0 https://maven.apache.org/xsd/maven-4.0.0.xsd">
    <modelVersion>4.0.0</modelVersion>
    <parent>
        <groupId>org.springframework.boot</groupId>
        <artifactId>spring-boot-starter-parent</artifactId>
        <version>2.6.4</version>
        <relativePath/> <!-- lookup parent from repository -->
    </parent>
    <groupId>com.minxyz</groupId>
    <artifactId>elasticsearch8</artifactId>
    <version>0.0.1-SNAPSHOT</version>
    <name>elasticsearch8</name>
    <description>elasticsearch8</description>
    <properties>
        <java.version>17</java.version>
    </properties>
    <dependencies>
        <dependency>
            <groupId>org.springframework.boot</groupId>
            <artifactId>spring-boot-starter-web</artifactId>
        </dependency>

        <dependency>
            <groupId>co.elastic.clients</groupId>
            <artifactId>elasticsearch-java</artifactId>
            <version>8.1.0</version>
        </dependency>
        <dependency>
            <groupId>com.fasterxml.jackson.core</groupId>
            <artifactId>jackson-databind</artifactId>
            <version>2.12.3</version>
        </dependency>

        <dependency>
            <groupId>org.glassfish</groupId>
            <artifactId>jakarta.json</artifactId>
            <version>2.0.1</version>
        </dependency>

        <dependency>
            <groupId>com.alibaba</groupId>
            <artifactId>fastjson</artifactId>
            <version>1.2.79</version>
        </dependency>

        <dependency>
            <groupId>org.projectlombok</groupId>
            <artifactId>lombok</artifactId>
            <optional>true</optional>
        </dependency>
        <dependency>
            <groupId>org.springframework.boot</groupId>
            <artifactId>spring-boot-starter-test</artifactId>
            <scope>test</scope>
        </dependency>
    </dependencies>

    <build>
        <plugins>
            <plugin>
                <groupId>org.springframework.boot</groupId>
                <artifactId>spring-boot-maven-plugin</artifactId>
                <configuration>
                    <excludes>
                        <exclude>
                            <groupId>org.projectlombok</groupId>
                            <artifactId>lombok</artifactId>
                        </exclude>
                    </excludes>
                </configuration>
            </plugin>
        </plugins>
    </build>

</project>
- 编写测试类
package com.minxyz.elasticsearch8;

import co.elastic.clients.elasticsearch.ElasticsearchClient;
import co.elastic.clients.elasticsearch.core.SearchResponse;
import co.elastic.clients.elasticsearch.core.search.Hit;
import co.elastic.clients.json.jackson.JacksonJsonpMapper;
import co.elastic.clients.transport.ElasticsearchTransport;
import co.elastic.clients.transport.rest_client.RestClientTransport;
import com.alibaba.fastjson.JSON;
import com.minxyz.elasticsearch8.entity.User;
import lombok.extern.slf4j.Slf4j;
import org.apache.http.Header;
import org.apache.http.HttpHost;
import org.apache.http.message.BasicHeader;
import org.elasticsearch.client.RestClient;
import org.junit.jupiter.api.Test;
import org.springframework.boot.test.context.SpringBootTest;
import org.springframework.util.Base64Utils;


@Slf4j
@SpringBootTest
class Elasticsearch8ApplicationTests {

    @Test
    void contextLoads() throws Exception {
        String auth = Base64Utils.encodeToString("elastic:elastic8888".getBytes());
        Header authHeader = new BasicHeader("Authorization", String.format("Basic %s", auth));
        Header[] header = {authHeader};
        RestClient restClient = RestClient.builder(new HttpHost("192.168.91.134", 9200), new HttpHost("192.168.91.136", 9200)).setDefaultHeaders(header).build();
        ElasticsearchTransport transport = new RestClientTransport(restClient, new JacksonJsonpMapper());
        ElasticsearchClient client = new ElasticsearchClient(transport);
        SearchResponse<User> search = client.search(s -> s.index("user-index").query(q -> q.term(t -> t.field("type").value(v -> v.stringValue("100")))),User.class);
        for (Hit<User> hit : search.hits().hits()) {
            log.info("result: {}", JSON.toJSONString(hit.source()));
        }
        log.info("success");
    }

}
在此处使用了RestClient.builder创建restClient,传入了多个HttpHost,测试的时候可以尝试将134节点关掉,在超时1秒后将连接136查询到数据;

